Thanks for visiting our introductory class about the Lonesome Car-boy stereo line up offered by Pioneer. Now after you buy your setup, how do you make it work?
One advantage of the Lonesome Car-boy lineup is that it’s modular. If you want to put it together or add something, you twist some connectors and plug them together and you are set. But there are a few wires involved with it. Some of these are just found on your amp, but some can also be on the tape deck or radio as well.
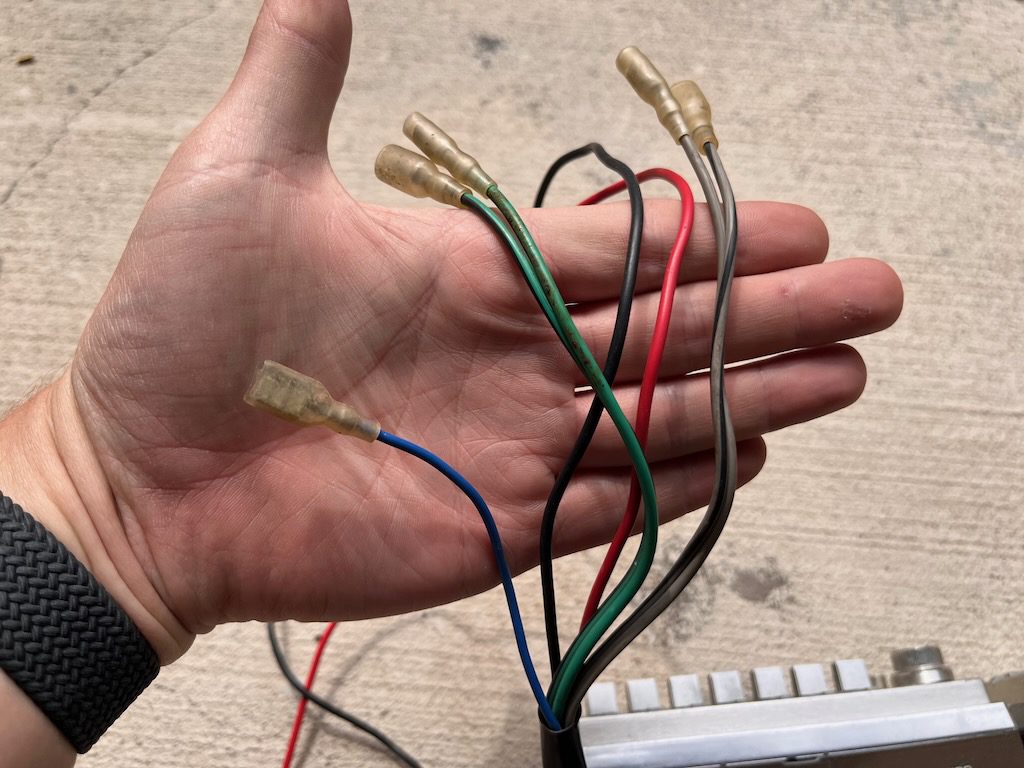
Red – 12v accessory (+)
Black – Ground
Green – Left Speaker (+)
Green / Black – Left Speaker (-)
Gray – Right Speaker (+)
Gray / Black – Right Speaker (-)
Yellow – Illumination
Orange – 12v Constant (+)
Blue – Optional accessory power supply / Not used. Used for switching between the stock stereo for AM/FM with the optional RD-300.
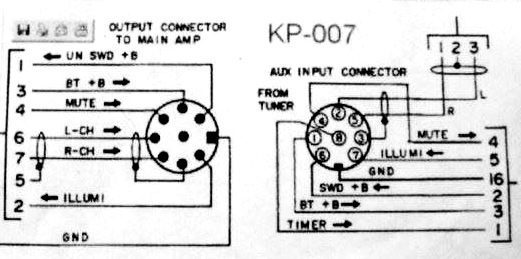
Lonesome Car-boy Wires
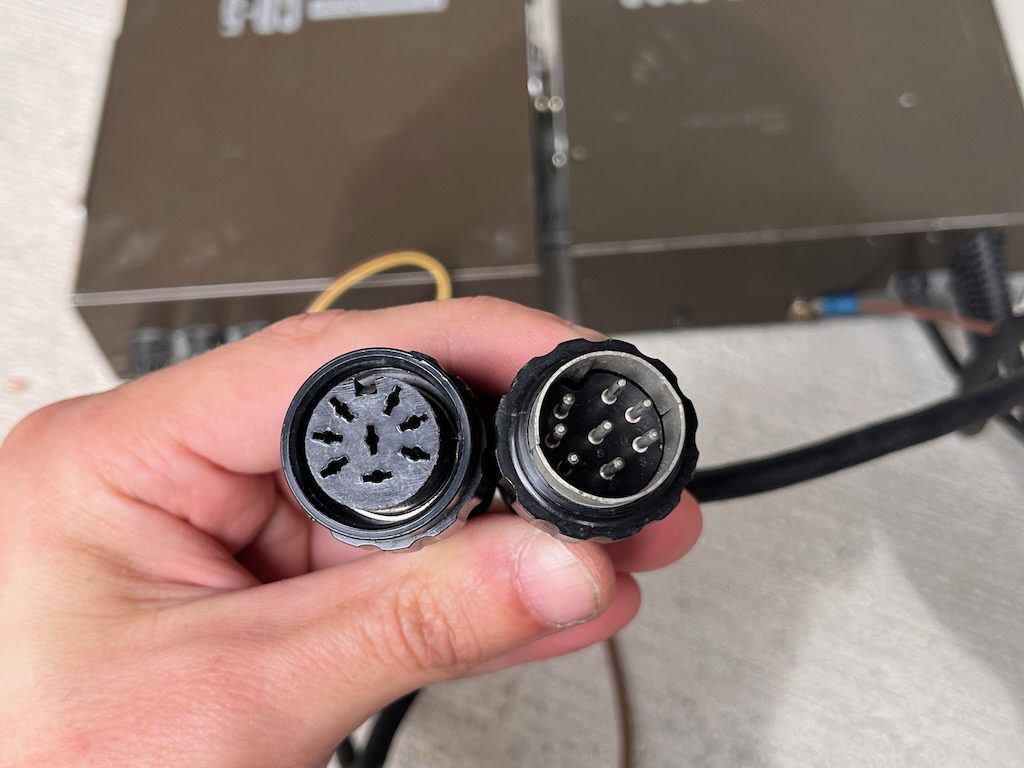
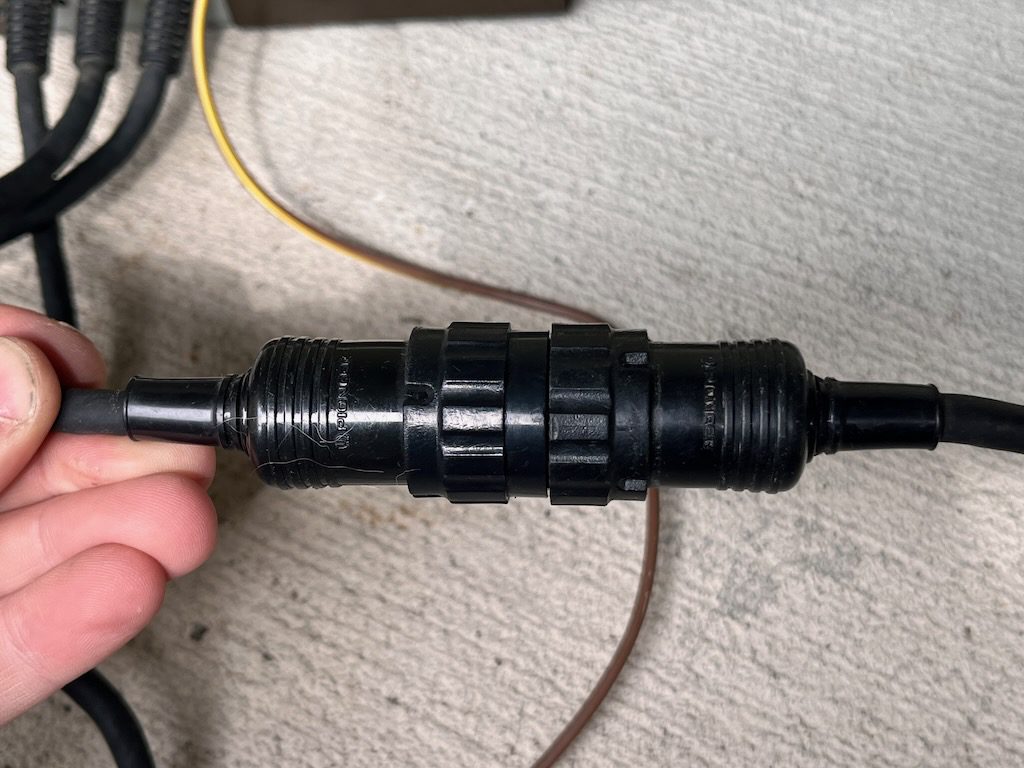
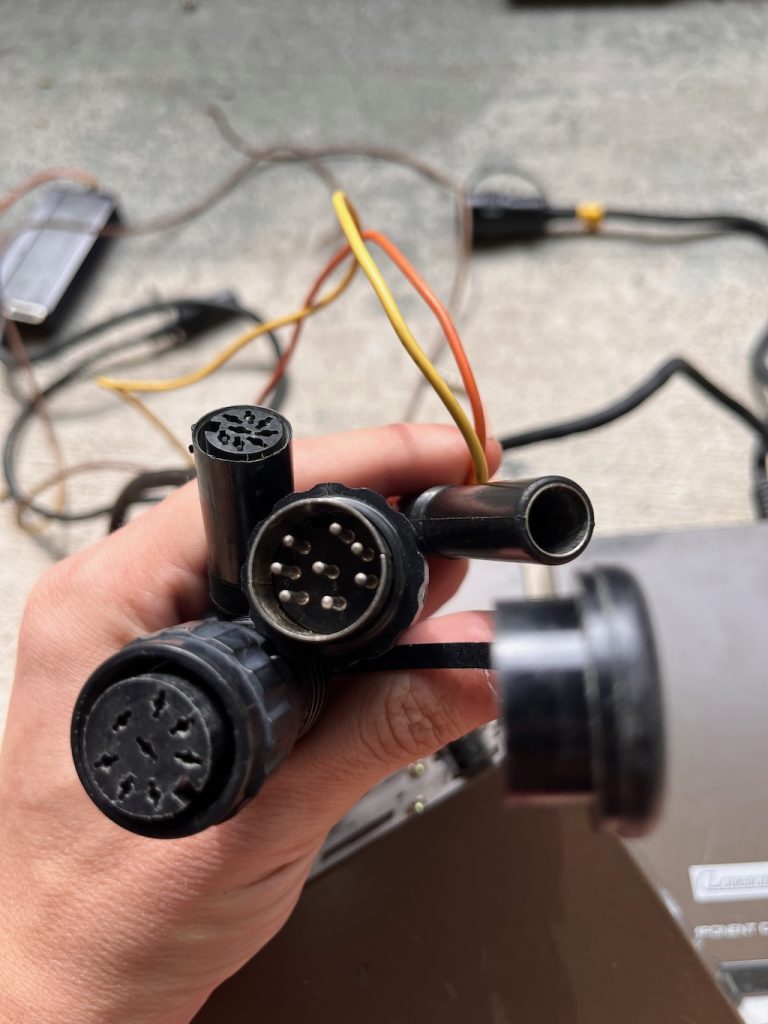
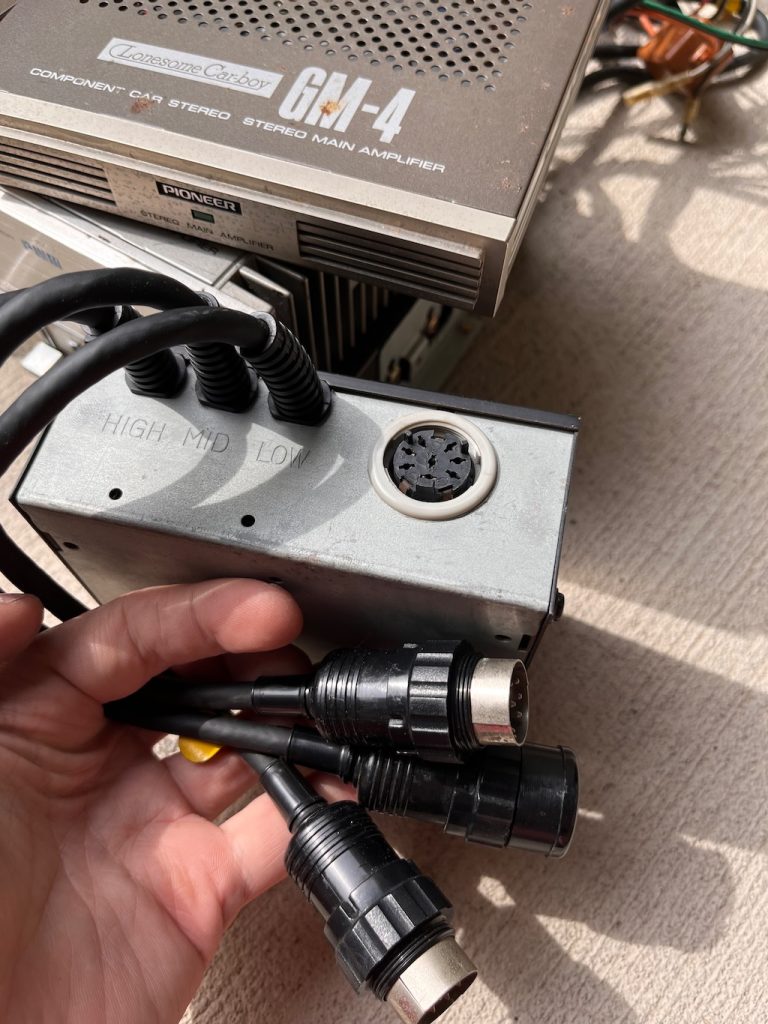
These here are the proprietary connector that makes the whole system work. The pros are it makes hooking up multiple components easy. The cons are that it only allows you to use Lonesome Car-boy components. Connecting them is easy. Match the keyway located at the top in this photo and slide them together. Once connect, twist rotating collar around them together to secure it.
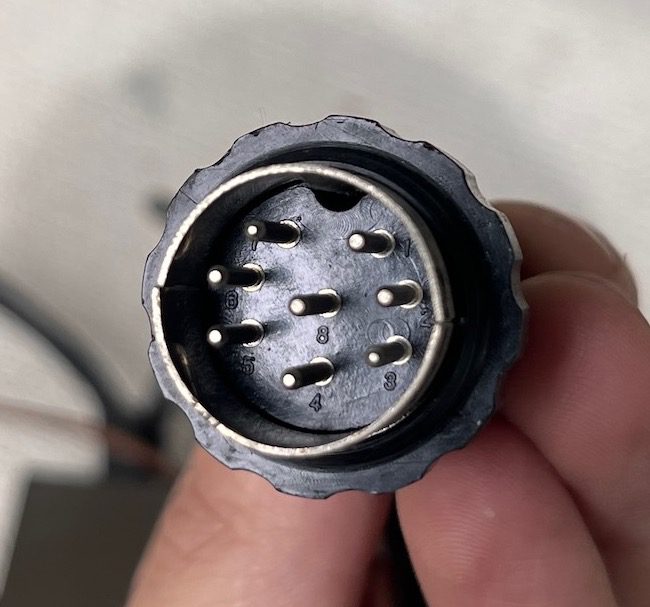
If you are like me, you were probably curious what’s involved with the connector. There is actually a lot more than you would think that is being sent.
Speakers
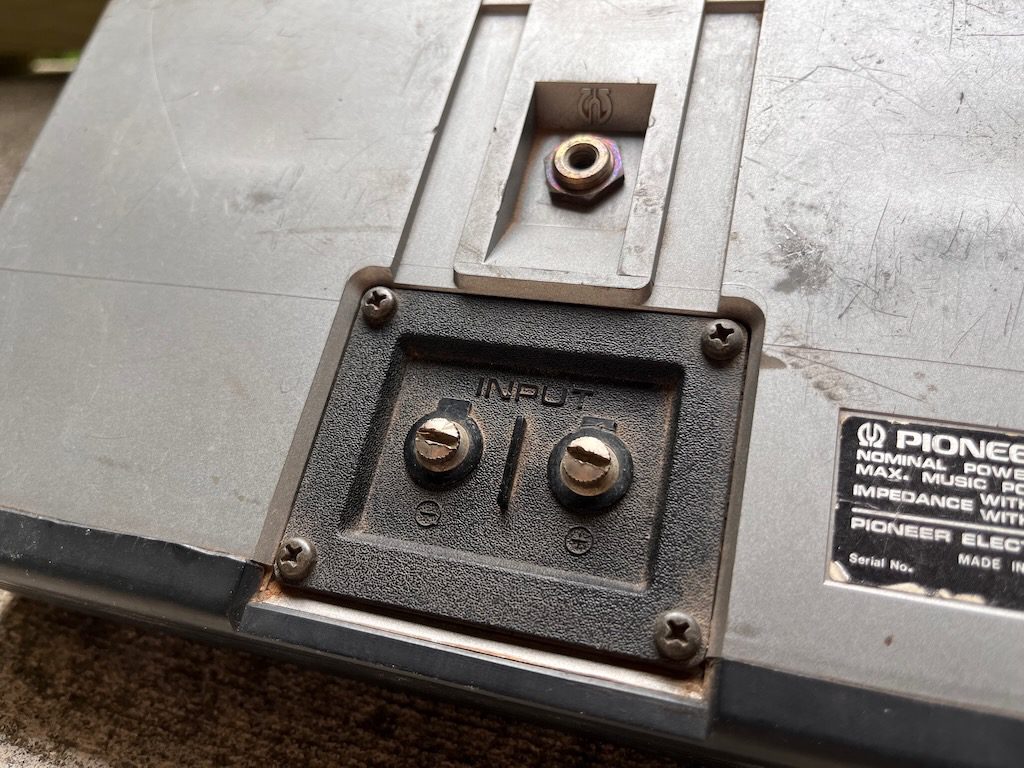
Wiring speakers is the most direct part of the install. Take your Green wire on the amp, run a wire from it to the speaker, and hook it up to the (+) terminal. Then take the Green / Black wire from the amp, run a wire from it to the (-) terminal. Congratulations, you have connected your left speaker. Repeat for the right speaker and the Gray, Gray / Black wire.
Grounds
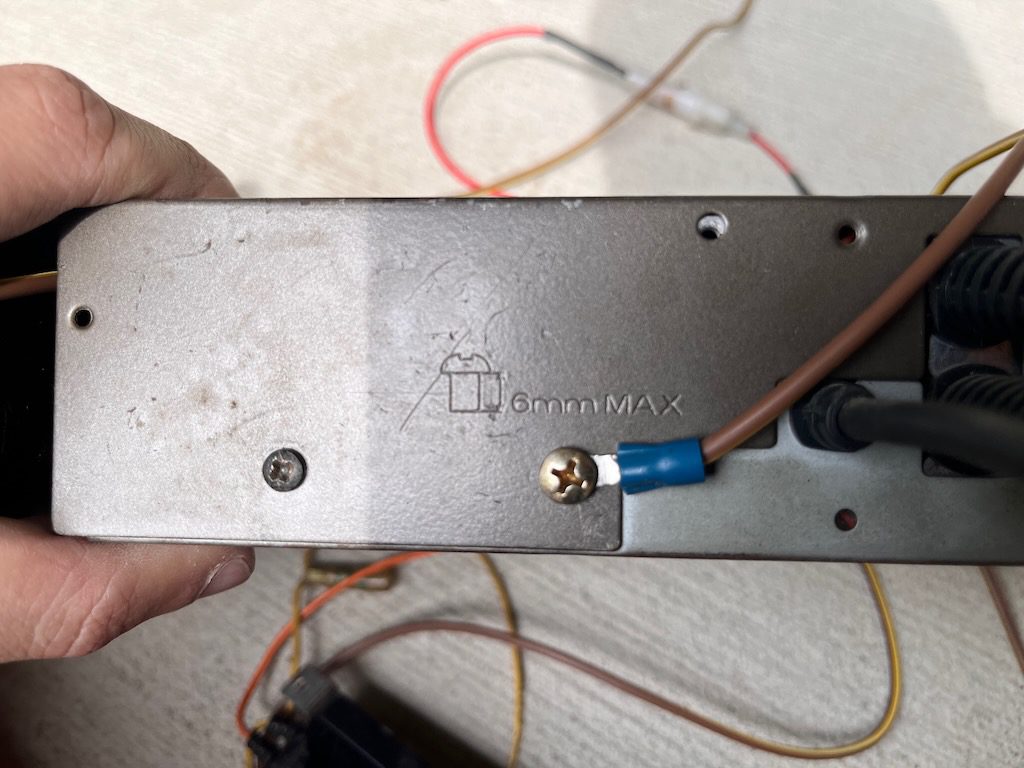
Unlike a lot of the newer stereos, these Pioneer stereos really benefit from adding additional grounds. I had issues trying to get one of my tape decks to turn on until I added an extra ground. So if you see this icon with the screw depth, its probably just a good idea to add a ground from the back of it to the chassis of the car. The screw size is a M4 x 6.
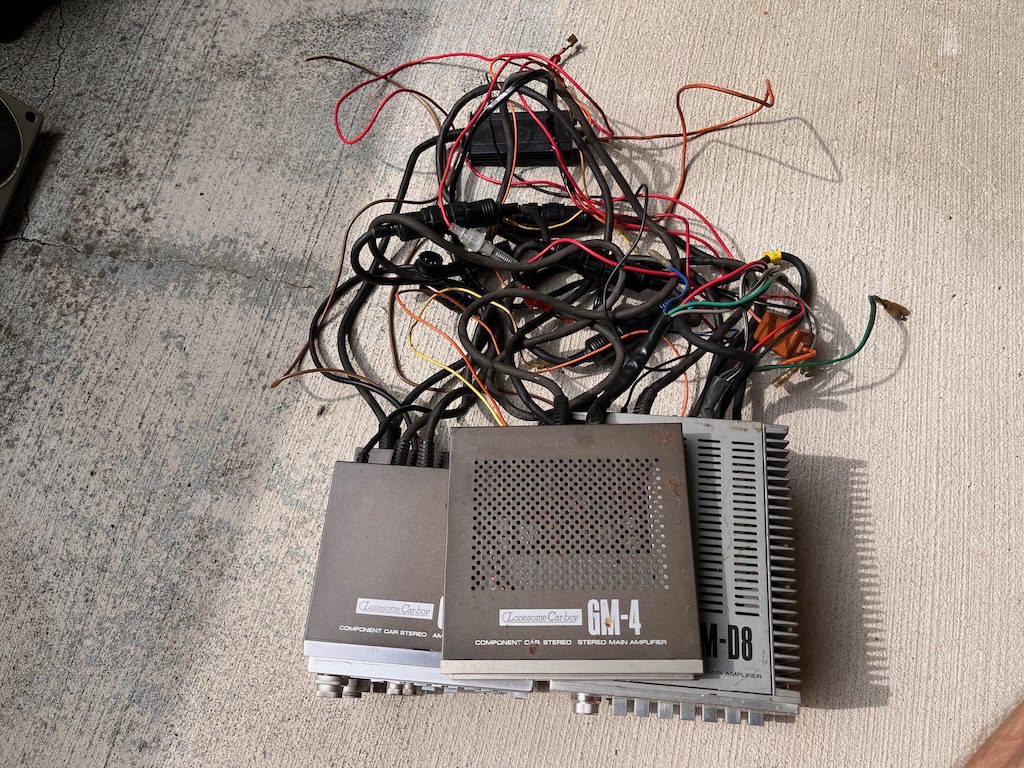
Simple Stereo
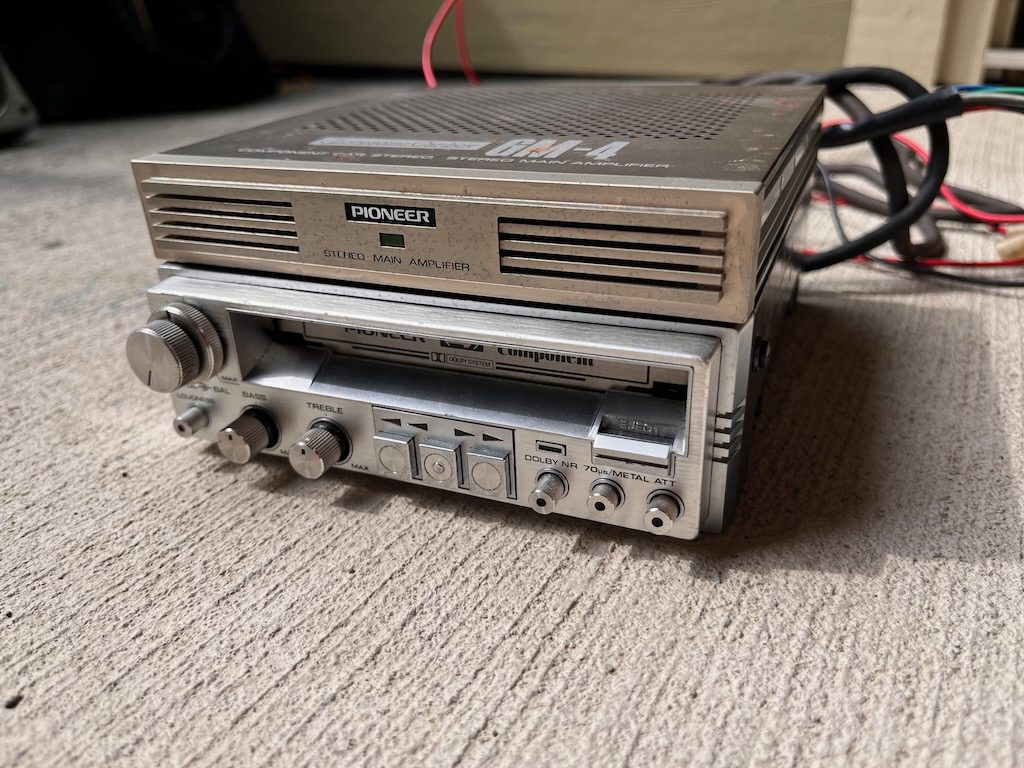
This is one of the more simple options for a stereo. We have a tape deck here which is the KP-707G and a GM-4 for an amp. This will allow us to run 2 speakers. Since it is simple, we just have to plug in one set of Lonesome Car-boy wires, hook up the amp to the car and wire in the speakers.
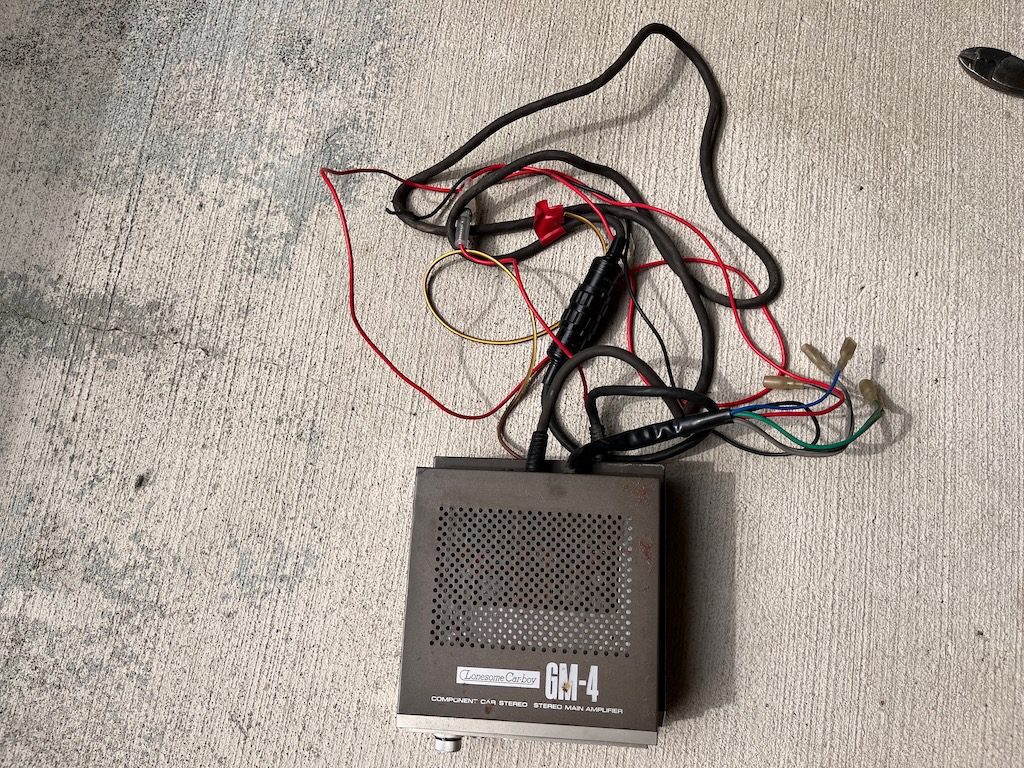
This produces a small wire bundle for you to try and hide as you install.
Equalizer Setup

So you want to add an equalizer to the previous setup? Well here you go. This has the KP-909G and the CD-5 equalizer sitting inside my ADT-355 tray. The KP-909G is slightly different than the last tape deck. This one requires adding the 12v constant and the illumination wires. This also contains an input for the updated Lonesome Car-boy plug.
On this setup, since we are adding the equalizer, we will connect the tape deck into that first.
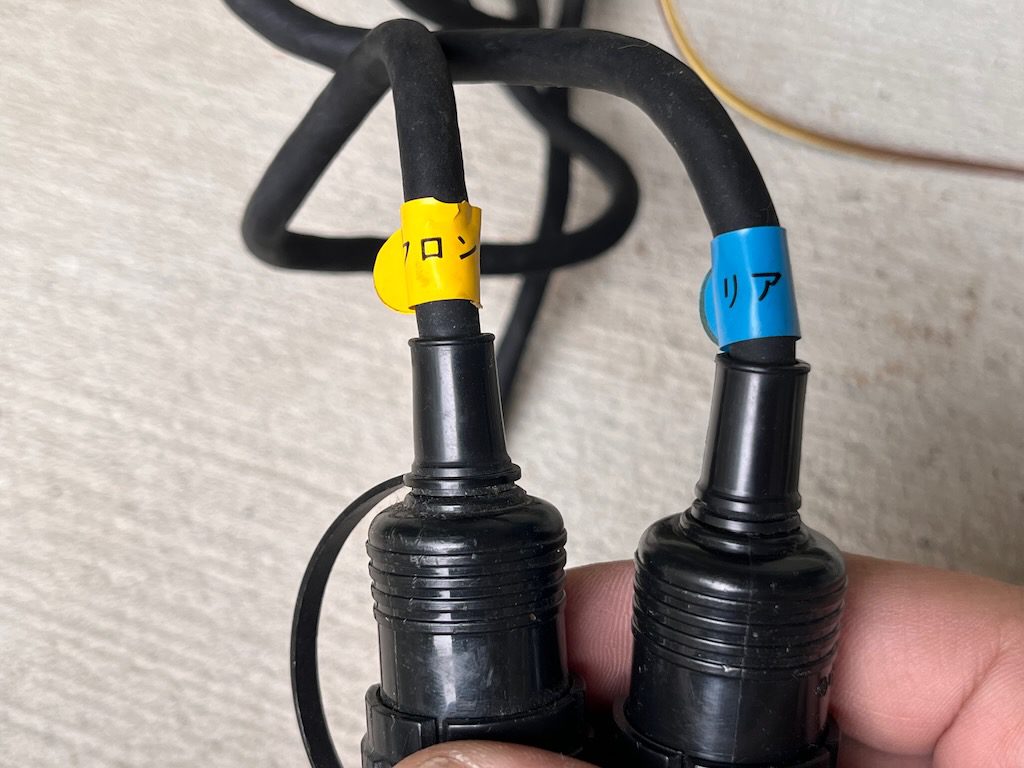
One advantage of having this equalizer is now you have split front and rear with fader knob. This works by having two separate outputs to two amplifiers. Yellow heads to the front, blue to the rear. Note, you don’t have to use both outputs. You can just run one of them, one amp and power two speakers.
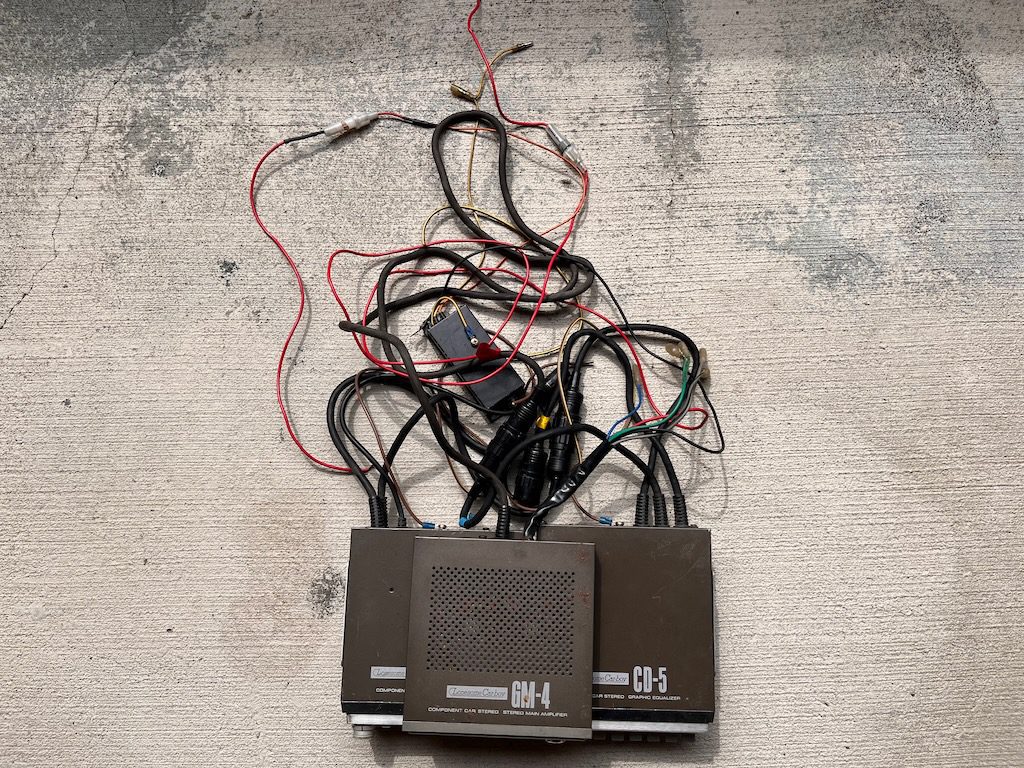
In this example I show the setup with just one amplifier. This added a lot more wires to our previous setup. I once read someone commenting about the mess of these wires that would explode out from under the dash, stating it was part of the aesthetic of these old stereos. Hopefully that will make you feel better about this mess.
Advanced Setup

This is the setup I plan to run in my Datsun 280z (whenever I get some paint on it). I wanted to run some dash speakers and the stock speakers on the GM-4 amp (the TS-M6 are designed to be paired with another set of speakers), and my TS-X8 powered by the GM-D8. The other addition to this aside from the GM-D8 is the GEX-91. This radio adds a bit more connectors on the back. It also has the illumination, 12v constant wire and the antenna, but also more plugs to connect it between the radio and equalizer.
It might be confusing, but the order of wiring goes: tape deck->radio->equalizer->split into two amps. Some older systems require purchasing another Pioneer adapter to connect both a radio and a tape deck so they can switch between each other. As for the amps, I will connect the GM-4 to the “front” connector of the equalizer and the GM-D8 to the “rear”.
As for my nest of wires, I am not too sure how I am going to hide it all. What I do know is it will look like spaghetti.
Bonus: Crossover
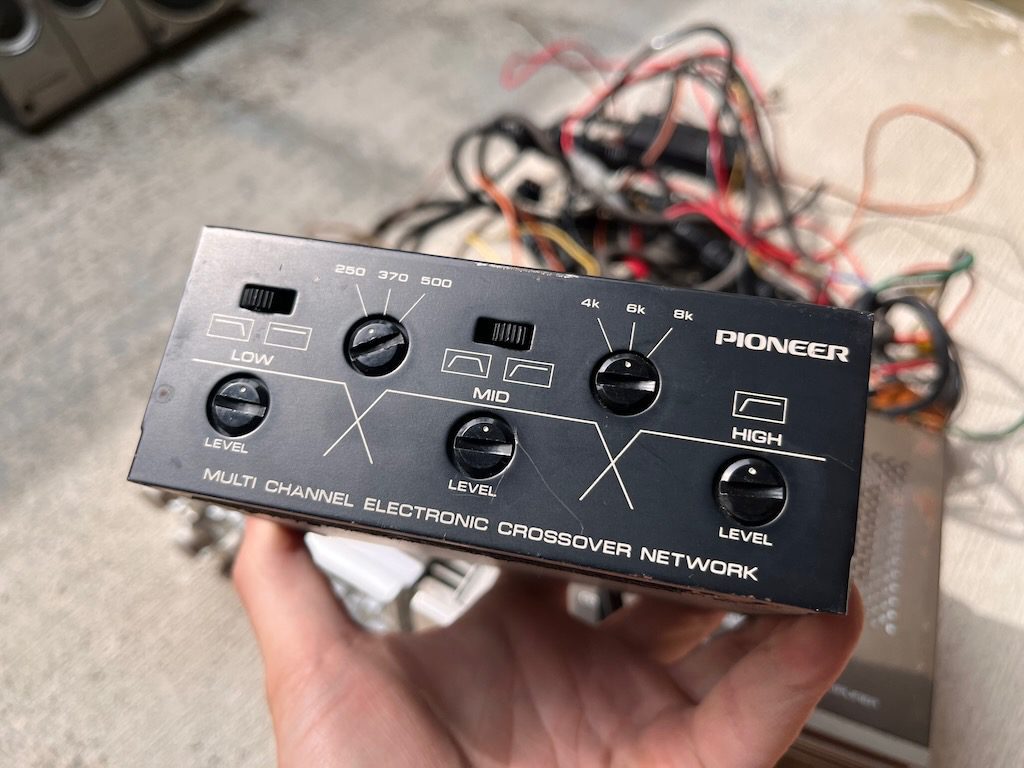
While this isn’t a very common part with most Lonesome Car-boy setups, I figured I would also cover it since I bought one (two by mistake). Unlike the equalizer that allows you to adjust the frequencies and send to both front and back amplifies, the multi channel crossover splits the channels up by frequency range and then sends them to the amplifier.
This is handy if you have speakers dedicated to perform specific tasks, similar to a subwoofer, mid-range and tweeter would work. This allows you to set a crossover point between the frequencies, and send anything above or below that range to a specific amplifier. The two switches near the top allow you to turn on or off the crossover for that section. Where as the dial on the top sets the roll off frequency. The bottom dial adjusts the volume level of that crossover.

Hi,
I’ve come across your website while randomly searching for manuals for these component systems.
I have a few bits and pieces of these (a pair of GM-40, a KP-88G and a CD-5 – I also have a KPX-9000 but unfortunately it’s in a very bad shape)
CD-5 and GM-40 came with manuals but not the KP-88G.
I’m hoping to get a GEX of some sort to match the rest and have 2-amp & 4-speaker setup.
Do I need an extra bit to go between a GEX and the KP-88G or it has a pass thru of some sort?
If you can share manuals, it would be appreciated.
Cheers
Hi there. The GEX I feature in this article has an in and out connector so it fits in between the tape deck and equalizer. I believe the GEX-60 has something similar.
Hi Brian.
Thanks for the answer above.
I have a couple more questions.
1) This is not quite period correct but have you thought about adding a sub by having a fader or an equalizer from the rear output of front/rear split equalizer? I think a custom preamp will be required because the preout from the HU on these Pioneer is quite low compared to modern HUs. Alternatively, use another Lonesome amp then hook it up to a line lever converter or high level input terminals of the sub amp.
2) I’m guessing your units are all in good condition so you may not be able to help but I managed to score some that have green corrosion spots, mostly on the front face (but also a little bit on the connectors). I managed to clean up the connector easy enough but not so much on the front face. Have you encountered this problem at all?
Thanks
1). They had subwoofers at the time like the GTS-X80. But finding one in good shape would be very difficult. It would be much easier adding a modern subwoofer and modern amp by using a line level converter. Some of the modern amps even have this built into them now. Usually people tap into the rear speakers, then it creates a signal that the amp can use.
2) I have seen a few units like this, which I assume is some sort of metal corrosion. Vinegar might work but I haven’t had personal experience to test it.
Hi Brian! Thanks for sharing this.
I have just bought a couple of good vintage speakers for my RV. Could I connect my phone or my laptop directly to the gm4 and listen music through my speakers? How could I do that?
Thanks!!!
If it is just vintage speakers, you can hook them up to any modern amp. If you are looking to have a full Lonesome Car-boy setup but also have an auxiliary in, look into either a tape adapter for the tape deck or an fm modulator like the iSimple IS31 for a radio.
Hello! I am reading this and while I understand most of it, I don’t understand how to run the signal from the amp to the stock speakers (front and rear.) Trying to get a setup for my 8th gen crown.
I see you mention that you can add 2 speakers with the simple setup, but where/how do I tie in the existing speaker harness? does that leave me with no stock speakers and just 2 pioneer speakers? do I splice the +/- speaker wire into multiple connections?
Any help would be appreciated ✌️
Hello Lane, The amp, whether you have the gm-4, gm-d8, etc, will have multiple wires coming out from it. After you hook up the power (red and orange) and ground (black), you need to hook up the left and right speaker wires, (green and gray set). Where you plug them in depends on the stock harness and what colors Toyota uses. I dont have an 8th gen crown wiring harness pinout, but a cressida of a similar year would be (pioneer wire color) [toyota wire color]: (red) [gray], (black) [black], (orange) [blue with yellow stripe], (green) [pink], (green/black) [purple], (gray) [green], (gray/black) [blue]. Hope this helps.
Hello, I have a brand new Pioneer GEX-60 AM FM radio. Can I use it without the amplifier. Is a adaptor plug and tail available for the 8 pin plug on the unit.
Unfortunately you will need the amp. This is a component stereo, so it is divided into multiple parts. If you were to get an amp, you can cut off the pig-tail and wire it yourself, but it would still need to go into an amplifier to amplify the signal.
Hi, I have a Gm-40 unfortunately someone has cut off the J1 connector. I’ve looked everywhere I could for a diagram and came up empty handed. Can you tell me what wire goes where? Big Orange Big red, small white small red and I’m seeing a smaller silver shield and the gold shield that is around all of them …..
The small red and small white are going to be the right and left audio channels. The big orange is the 12v+ constant, and the big red is the 12v+ switched. Then I believe one or both of the shields are grounds.
Hi in near future I will purchase a component tuner and a CD5 eq, can I use the front and rear amp from my excisting stereo or do I have to purchase the comp amplifiers like GM4 and GM120
thanks for your comments
It is a component stereo with proprietary connectors. You should use the amps from the same system. You can technically use any amp so long as you cut the connector and join the two systems. But you would also need to use a low-level converter and a manual remote turn-on for the amp. I wouldnt recommend it.
Hello Brian
I have a KpX 5900 deck with intact connector and would like to pair it with a GM-A200 amp but it has a smaller size connector. I do not want to buy the adapter cord. The amp has two choices for the input, component and RCA. Before I cut the connector end off and add RCA plugs my question is do I just connect up the positive and negative wires from deck to constant and switched power as I would a normal deck. Thanks Lawrence